
Request a role
Use the Dashboard tab to activate a role you are eligible for. If the role needs approval, your request goes to the approvers; if not, it activates without an approval step.
Request a role
Section titled “Request a role”-
In Teams, open TeamsPIM and select the Dashboard tab.
-
Go to My Roles → Entra Roles → Eligible Assignments. For a group or an Azure role, choose Groups or Azure Resources instead of Entra Roles.
Shortcut: if the role is listed under Most Frequent PIM Requests on the Overview page, select Activate there.
-
Find the role. You can search by role name or description, or use Filter to narrow the list.
-
Check the role’s “Activation:” line:
- Self-Activation — no approval needed.
- Approver Required — the request goes to the approvers shown next to it.
-
Select Activate. A drawer opens, titled “Activate - “ followed by the role name.
-
Read any requirements notice at the top of the drawer, then fill in the fields (see the table below). A reason is always required.
-
Select Activate. You see “Request created successfully.” with a Go to overview link.
Fields in the activation drawer
Section titled “Fields in the activation drawer”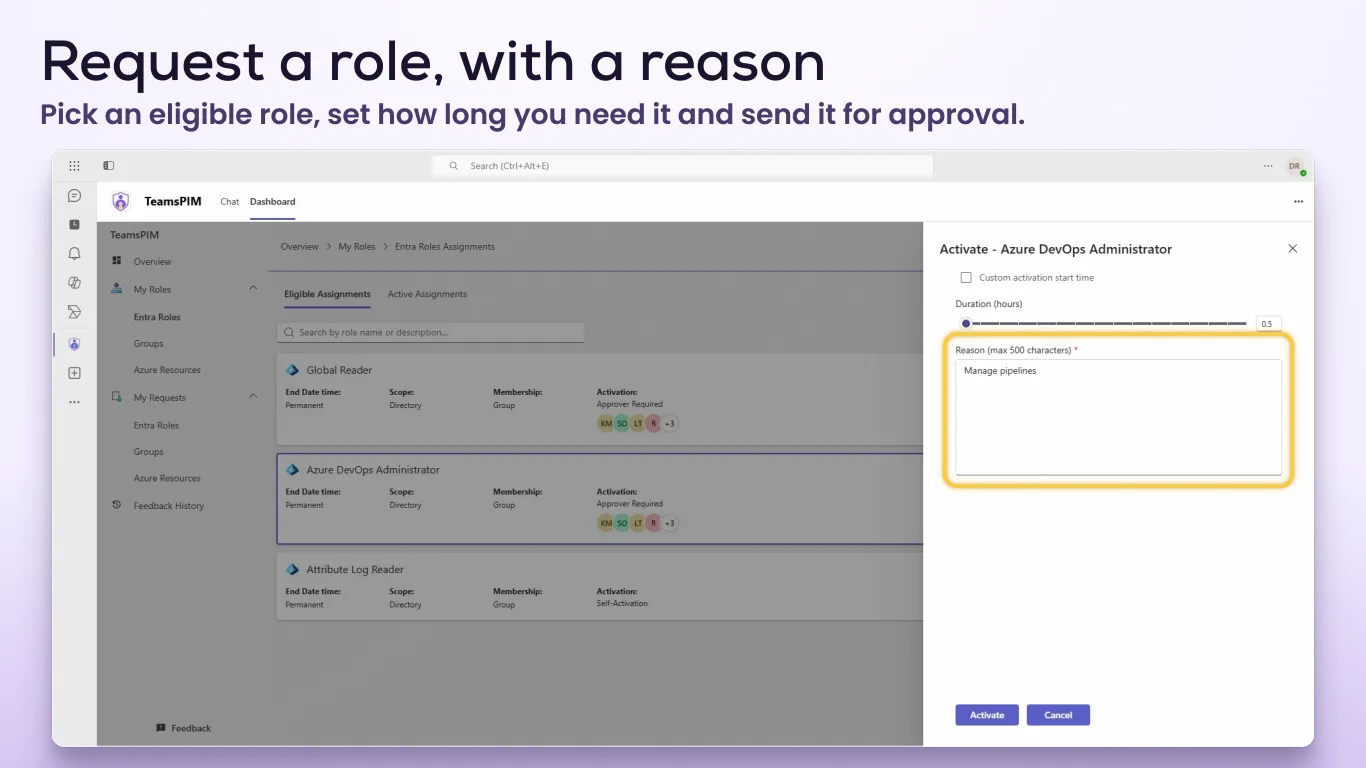
| Field | What to enter |
|---|---|
| “Custom activation start time” | Leave it off to start now. Turn it on to choose a start date, time and time zone. The time zone defaults to your browser’s. |
| “Duration (hours)” | Use the slider or type a value, in half-hour steps. The minimum is 0.5 hours. The maximum is the role’s PIM maximum, and the value starts at that maximum. |
| “Ticket number” | Only shown when the role’s PIM settings require ticket information. Required when shown, for example INC0012345. Up to 128 characters. |
| “Ticket system” | Shown with Ticket number. Optional, for example ServiceNow. Up to 128 characters. |
| “Reason (max 500 characters)” | Always required. Tell the approvers why you need the role. |
Requirements notice
Section titled “Requirements notice”If the role’s PIM settings add extra checks, the drawer tells you before you submit, for example:
This role requires multi-factor authentication to activate.
The notice can name multi-factor authentication, a Conditional Access authentication context and ticket information. When an authentication context is required, it adds “You may be asked to sign in again.”
If you see “Additional verification required”, select Verify and complete the sign-in. If you see “Set up multi-factor authentication”, register at aka.ms/mfasetup, then sign out of Teams and back in.
Differences by type
Section titled “Differences by type”Go to My Roles → Entra Roles → Eligible Assignments. Each card shows “End Date time:” (or “Permanent”), “Scope:”, “Membership:” and “Activation:”.
Only directory-scoped roles are supported. Roles scoped to an application or an administrative unit cannot be activated in TeamsPIM.
Go to My Roles → Groups → Eligible Assignments. Each card shows “Group type:” (Security or Microsoft 365), “Membership:”, “End Date time:” and “Activation:”.
You can be eligible as a group Owner or Member. The drawer title shows which one you are activating: “Activate - Owner” or “Activate - Member”.
Go to My Roles → Azure Resources → Eligible Assignments. Each card shows “Resource:”, “Resource type:” (Subscription or Resource Group), “Membership:”, “End Date time:” and “Activation:”.
Azure roles are supported at subscription and resource-group scope. Your administrator must have assigned TeamsPIM to the Azure subscription so it can handle PIM requests for that subscription’s resources. See Azure resources.
What happens next
Section titled “What happens next”- Approval needed: the request shows Pending Approval. Each approver gets a card in their chat with the TeamsPIM bot, and you get a card marked “My Request” so you can follow it. See Track your requests.
- No approval needed: the role activates without an approval step, and the bot sends you “Self-Activation role has been provisioned”.
Activation can take a few seconds to show. If the role is not listed under Active Assignments yet, refresh the tab.
If the request fails
Section titled “If the request fails”- “Request creating failed.” followed by a message: the message comes from Microsoft Entra and explains why PIM refused the request.
- A request for this role is already pending: you cannot make a second request for the same role while one is waiting for approval. Wait for the decision, or cancel the pending request first.
- “No TeamsPIM license assigned”: ask your administrator to assign you a licence, then reopen the app.
More fixes are in Troubleshooting.