
Approve or deny a request
Approvals happen in your chat with the TeamsPIM bot, not in the Dashboard tab. When a request needs your approval, the bot sends you a card. You add a justification and select Approve or Deny.
Who gets the cards
Section titled “Who gets the cards”- The approvers set in the role’s PIM settings in Microsoft Entra. If an approver is a group, its members get cards.
- You need a TeamsPIM licence to receive approval cards.
- PIM does not let you approve your own request. When you raise a request yourself, you get a card marked “My Request” showing “Pending Approval”, with no buttons.
Approvers are configured in Entra, not in TeamsPIM. If the wrong people are getting cards, ask your administrator to check the role’s settings — see Approvers and role settings.
What is on the card
Section titled “What is on the card”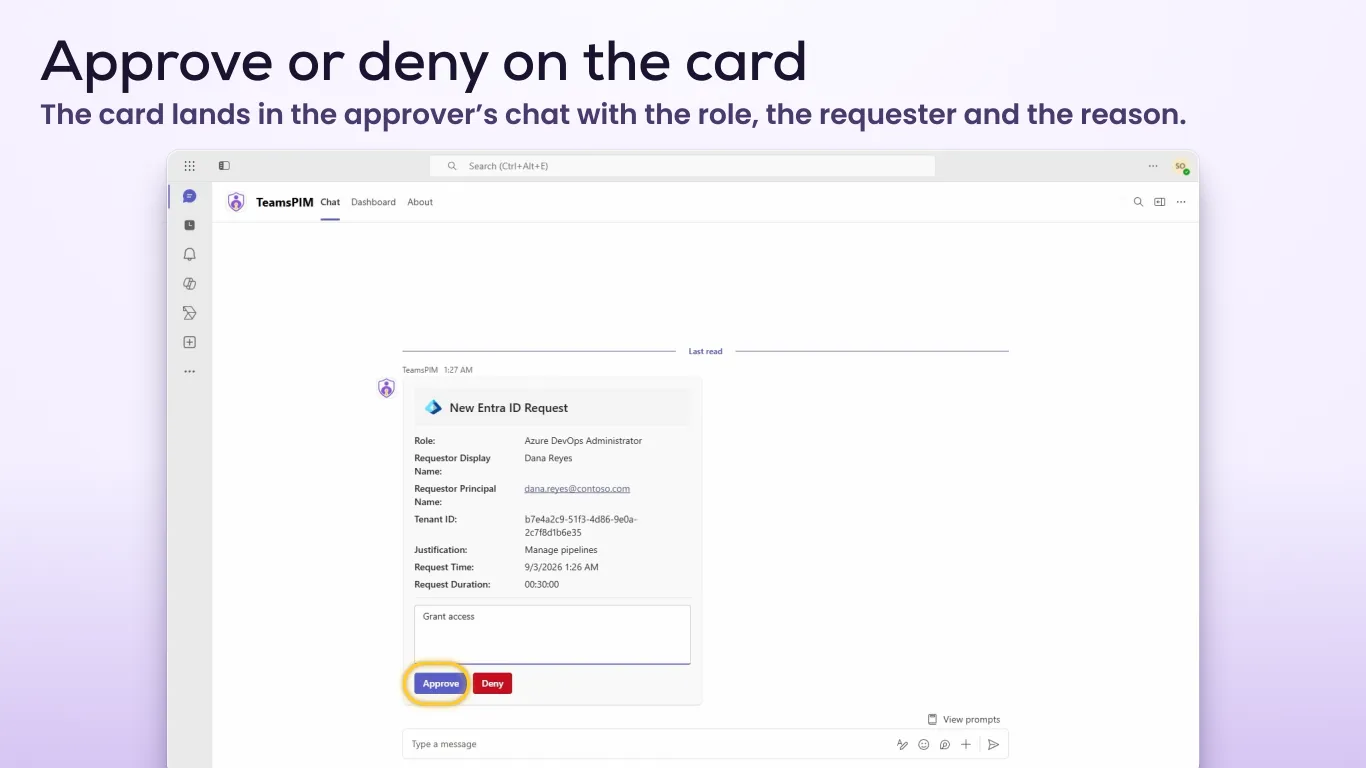
The card title tells you what kind of request it is:
| Card title | Details shown |
|---|---|
| “New Entra ID Request” | Role |
| “New Entra Group Request” | Group Display Name |
| “New Azure Resource Request” | Resource Name, Resource Type, Role Display Name |
Every card also shows Requestor Display Name, Requestor Principal Name, Tenant ID, Justification, Request Time and Request Duration. It shows Ticket Number and Ticket System when the requestor gave them, and Request Start Time when the requestor chose a custom start time.
Approve or deny
Section titled “Approve or deny”-
In Teams, open TeamsPIM and select the Chat tab. Find the card for the request.
-
Read the details: who is asking, for what, for how long, and why.
-
Type your reason in “Add a justification (Required)”. You cannot approve or deny without one.
-
Select Approve or Deny.
-
If the card shows “To continue please sign in”, select Sign In and complete the sign-in. Then select Approve or Deny again.
The one-time sign-in
Section titled “The one-time sign-in”The first time you approve or deny, the card asks you to sign in. You may also be asked again when multi-factor authentication or Conditional Access needs you to act. Signing in means the decision is made with your own identity, so PIM records you as the reviewer.
What happens after you decide
Section titled “What happens after you decide”- Your card shows “✅ Your approval request has been submitted and is being processed.”
- It then updates to “You approved this request” or “You denied this request”.
- Your Teams activity feed shows “Request has been successfully approved.” or “Request has been successfully denied.”
- Other approvers’ cards update to “The request was accepted by” or “The request was denied by”, followed by your name.
- The requestor’s card shows “Approved by” with your name and “Role is active”, or “Denied by” with your name. The requestor also gets an activity feed notification.
When several people can approve
Section titled “When several people can approve”The first decision wins. If another approver has already acted, or the request has ended another way, selecting a button shows one of these messages instead:
| Message | Meaning |
|---|---|
| “⚠️ PIM Request card is stale. The request may have already been processed.” | Someone else already decided, or the request is no longer pending. |
| “This request is already being processed. Please wait for the result.” | A decision is being processed right now. Wait for the card to update. |
A card can also end as “Expired” if the approval window ran out, or “The Request has been canceled” if the requestor cancelled it. How long a request can wait for approval is set by PIM, not by TeamsPIM.
Other messages on the card
Section titled “Other messages on the card”| Message | What to do |
|---|---|
| “Justification text is required.” | Type a justification, then select the button again. |
| “PIM Request not found.” | The request no longer exists in PIM. There is nothing to approve. |
| “❌ Action failed. Please try again or contact support.” | Try again. If it keeps failing, see Troubleshooting. |